Beauty Bloggers Jeannine Morris and Wendy Rodewald Create Their Dream Wedding-Day Looks

MAKEUP & SKINCARE
Beauty Bloggers Jeannine Morris and Wendy Rodewald Create Their Dream Wedding-Day Looks
By
Published on October 17, 2013
We're obsessed with beauty bloggers, so we asked two of our favorites, Jeannine Morris and Wendy Rodewald, to share their wedding-day makeup regimens!
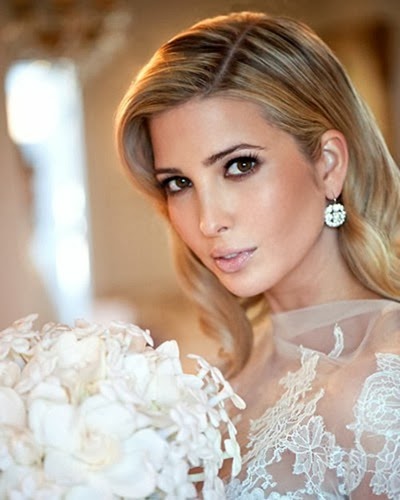
 and Wendy Rodewald from [DailyMakeover.com](http://DailyMakeover.com) to show us how to create their ideal wedding day look with products they already own. In six super easy steps, they were both able to demonstrate their adept skills and create totally wedding-ready looks that will help you [look like your best self](http://www.brides.com/blogs/aisle-say/2013/10/wedding-makeup-tips-eyelash-extensions-spray-tan-for-wedding.html). Check out their how-tos and get some ideas for items to pack in your [beauty emergency kit](http://www.brides.com/blogs/aisle-say/2013/10/wedding-day-emergency-beauty-kit.html). Their DIY makeup tips are especially helpful for brides who plan to sport a [do-it-yourself wedding hairstyle](http://www.brides.com/wedding-dresses-style/wedding-beauty/beauty-countdown/2012/08/diy-wedding-updo-hairstyle-messy-bun-how-to\#slide=1). These tips are so good, we're even convinced that Jeannine and Wendy may not need to hire a makeup artist on their actual day! Here, tips and tricks on how to do your own wedding makeup without missing a beat.](https://media.brides.com/photos/580e84342e8f16de77cdcb83/master/w_854,c_limit/2013_bridescom-Editorial_Images-10-beauty-blogger-wedding-day-makeup-tips-Large-beauty-blogger-wedding-day-makeup-tips-intro.jpg)
Whether or not you decide to hire a makeup artist on your wedding day, it's always important to test out different beauty looks, techniques, and regimens before you put in a deposit. We asked two of our favorite beauty bloggers and experts, (who also happen to be getting married!) Jeannine Morris from BeautySweetSpot.com and Wendy Rodewald from DailyMakeover.com to show us how to create their ideal wedding day look with products they already own. In six super easy steps, they were both able to demonstrate their adept skills and create totally wedding-ready looks that will help you look like your best self. Check out their how-tos and get some ideas for items to pack in your beauty emergency kit. Their DIY makeup tips are especially helpful for brides who plan to sport a do-it-yourself wedding hairstyle. These tips are so good, we're even convinced that Jeannine and Wendy may not need to hire a makeup artist on their actual day! Here, tips and tricks on how to do your own wedding makeup without missing a beat.

Jeannine Morris of BeautySweetSpot.com
My fiancé, Joe, and I are getting married next June in NYC. Even though I'm obsessed with testing out new formulas and color trends for TV segments and BeautySweetSpot.com, I don't normally wear a lot of makeup on a day-to-day basis. Therefore, on my wedding day I want to look like the best version of myself without being over done. It's important to me for Joe to really see me walk down the aisle, not 'a look.' The look: feminine and fresh faced, without being too sweet. I'll be OCD about my skin looking completely flawless, will want my face appropriately contoured and keep an emphasis on my eyes. Here's a break down of how I'd envision my makeup to look, but of course, I'll need a little help from a real pro!Since we're getting married in June, my color palette includes bronze and peachy tones. It'll give me a very natural, golden look with a little flush.

Step 1: Line the Eyes
When doing makeup for a special event I like to begin with my eyes so I can clean up around them before perfecting my skin. Since I want the emphasis to be on my eyes, I want them to be defined and start by lining my inner lower rim and upper lid with a waterproof (happy tears) cream liner in dark brown, which will keep the intense look soft.

Step 2: Fill in Eyebrows
Even though my brows are in good condition, I'm still going to fill them in lightly with a pencil a shade lighter than my hair to emphasize their shape and deepen the color. After all, they frame my entire face!

Step 3: Find the Perfect Lip Color
Color on the lips is a must for a bride. Since I'm keeping the emphasis on my eyes, I'm going to do just a bit of color on my wedding day. I decided on using a lip stain for the ceremony (so it will last all day) and adding gloss on top of it for the reception. Fancy, huh?

Step 4: Marry False Lashes with Real Ones
Normally I apply two coats of mascara, but on this day falsies are a must. I'll add some individual false lashes to the outer corner of my eye and then apply mascara.

Step 5: Add Contour to Face
After spending time on my skin, a dusting of bronzer wherever the sun would naturally hit along with pop of color onto my cheeks completes my look.

Step 6: Set Your Look
To ensure my makeup lasts all day and into the night I generously mist a makeup setting spray, which will keep it looking fresh. Yes, even in the June heat.

Final Look
I look like myself with makeup on! Mission accomplished. Of course, with a little help from a makeup artist, I hope to take this look and look flawless on my wedding day!

Wendy Rodewald of Daily Makeover
I think about beauty all day, every day in my job as Senior Editor at Daily Makeover, so I knew I wanted to make a statement with my own wedding makeup. The tricky part was coming up with a look that wouldn't look too out-there in photos and would let me look more or less like my usual self (needless to say, my original blue liquid liner idea didn't make the cut). I settled on a neutral, not-too-smoky eye paired with a stained berry lip—my statement feature. The lip color felt both current and classically flattering, and I loved that it would play off the dark purple and burgundy accent shades in my fall bouquet. Plus, it would be a cinch for my makeup artist to recreate on the big day.

Step 1: Prep Face and Lips
I prep my skin with moisturizer and apply a hydrating balm to my lips. I tend not to use makeup primers because the extra layer of product on my already oily skin actually makes my makeup break down faster.

Step 2: Apply Foundation
Using a dome-shaped brush, I buff a lightweight foundation into my skin, taking care to blend past the jawline and onto the neck. I wouldn't want to look two-toned in my wedding photos!

Step 3: Add Highlighter
I apply a cream highlighter to my cheekbones and Cupid's bow above the lip. I'll set this with powder so the effect is more luminous than shiny.

Step 4: All About the Eyes
I dust a pale, neutral shadow all over my lids and onto the brow bone, then add a medium taupe in the crease and along the lower lash line. I add a darker brown on the outer corners, and blend everything together with a brush so there are no harsh lines. Using a small angled brush, I draw gel liner along the top lash line to add definition to my eyes. I fill in my brows with pencil and apply mascara to curled lashes.

Step 5: Blot Lips
A deep berry-colored stain feels perfect for my fall wedding. Using my fingers, I press a dark, purplish lip color into my lips, then blot the lipstick to create a sheer wash of color. Bonus: Blotting ensures this look will last through drinks, dinner and the first kiss.

Step 6
I add blush as the final step, because it's easy to overdo it when you aren't wearing any lip color. If I do my lipstick first, I can make sure the lips and cheeks harmonize.

Final Look
I love that this look is like a more polished and defined version of my every day makeup. I can't wait to see how it looks with my wedding dress!


Comments
Post a Comment